Tuesday, April 30, 2013

Lego Play Mat


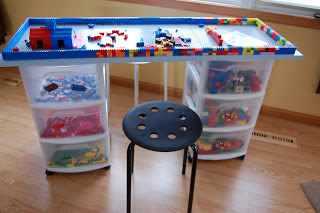
She's back!  The Princess (We call her this because when anyone asks her name she says "Princess Jasmine") is sick and staying with me this week.  So I thought I should dedicate my posts this week to projects we've done to keep her busy while she's here.  Today I'm going to show you one of her favorites.  I must admit it's one of mine too.  We find ourselves playing Legos a lot when she's here!  I know the Lego creations on the table make her look like a genius!  I must admit they are Dan's creations.  He is the true Legomaniac!

Being that my kids are grown and I like the fact that my house doesn't have to be littered with toys, I wanted something that would store all of her legos but could also be put away in her toy closet.  That is where she keeps all her toys and how I keep my house looking toy free.

Below are two posts that helped give me the idea to make the Play Mat.  The Drawstring Lego Mat I found on Lesley's Blog Finding Time and  the Lego Table on Our Wee Family.


Drawstring Lego Mat


Lego Table
To start the project I went to my favorite source for fabric, Walmart.  I purchased one twin flat sheet for $5.  I then went online and found several pictures of Lego Play Mats and let the Princess pick which one she liked best.  I measured my table and gave myself a 1/2 inch seem allowance all the way around.  Then, I drew the picture onto the sheet.  I was lucky enough to be able to do this whole project on my kitchen island.  I covered the island with a plastic shower curtain I purchased at Dollar Tree.  It's my go to for messy projects.

Next, I went to my stash of acrylic paints and chose my colors.  You can tell I didn't want to make any trips to the store by the color of my pond in the middle.  I didn't have a light blue so I mixed dark blue with white.   As you can see the result was not a vibrant blue!  

Once everything was painted and dry I started working on the pockets.  I cut 4 strips of fabric the length of the mat and the depth I wanted.  I sewed the mat and one strip of fabric right sides together, wrong sides facing up.  Then, I flipped it over to the right side and attached a piece of velcro the length of the mat on the unpainted strip.


Next, take a second strip of fabric, fold over the edge and hem it.  Along that hem on the wrong side attach the other side of your velcro.  

Laying your mat on the wrong side, place the second piece of fabric on top of the 1st with the velcro facing up. Now sew along all three outside edges of the fabric.


Turn your pocket right side out.  Attach velcro together and iron out your seam.  Repeat the process on the opposite side of the mat.  Then hem the two sides of the mat that do not have pockets.  You can add pockets on all 4 sides if you would like (Something I plan to do to mine in the future).


I placed the finished product on my coffee table and the Princess was ready to play.  The best part of this project is the easy clean up after playing.  We just scoot all of the pieces into the pockets.  Velcro them closed.  Roll up the whole thing (should have added straps to keep it closed and handles) and into the toy closet it goes!


Stay tuned for more kids/kid at heart projects this week!

Enjoy,
Mel


Friday, April 26, 2013

Magnet Fun


I'm taking a little break from the Princess Room.  I had a little visitor yesterday.  This is Jacee, my nieces little one.  I usually watch her on the weekends while her mom is at work.  She was sick yesterday and couldn't go to school.  So of course that meant Project Time!  She is 4 yrs old and really into learning right now. (Obsessed with her letters and their sounds).  I have a page on Pinterest just for such occasions.  Baby P Makes Three had a post with a framed magnet board that sparked the idea for our project.

DYI Magnet Board

I loved this idea but I had no room for it and wanted something a little more portable.  So I tweaked it a little to work for us.  Here is a list of all the items I used and where I purchased them:
   
     Cookie Sheet (Dollar Tree $1)
     Card Stock Paper (Had on Hand)
     Adhesive Magnet Sheets (Walmart $1.97 ea)
     Self Adhesive Clear Single Sided Sheets (Walmart $5.88 for 10)

I then found a great website for the print outs.  MRPrintables.com.


Alphabet Flashcards

Color Alphabet Cards

Simple Printable Numbers

The last printout I used was from sparklebox.co.uk.

Jungle Animal Flashcards

For the Jungle Animal Flashcards I followed the directions when printing to minimize the pictures so that I wouldn't use as much of the magnet sheets.  I printed everything onto cardstock paper.  Once everything was printed I attached the self adhesive clear sheets to the pages before cutting them out.  I then put my little helper to work.  She was more than happy to cut out all the letters and numbers for me.  Cutting is one of her recently acquired skills, so everything wasn't exactly cut on the lines.  No problem.  Being that her scissors could not cut through the magnet sheets, once I attached the magnet sheets I straightened out the cuts a little.  Also, before I attached the magnets to the Jungle Animal Flashcards I turned them over and drew a line through the middle of the card (As you see in the first picture the object of this game is to match the two pieces of the animal)  After she cut them in half, I then added the magnet to the back.  I cut out all of the Alphabet Flashcards and added the magnets.  Then she was ready to play! 

One of the things I probably would have done differently with this project is, I would have minimized the size of the Alphabet Flashcards.  It used up the bulk of my magnet sheets!


All in all it was a success!  I always know when our projects are successful because instead of leaving them at my house to play with when she comes over, she tries to sneak them into her backpack to take home.  She was easily caught in the caper, being that this project was a little too large to fit into her backpack!  So upset I didn't have my camera on hand at the time!

Enjoy,
Mel


Tuesday, April 23, 2013

Ruffled Lamp Shade


More from the Princess Room.  This sweet little lamp, was inspired by one that I saw at Hobby Lobby.


To start things out I found this lamp.  Before I worked on the lamp shade I primed and painted the lamp.  I used my favorite primer Zinsser.  I happened to have on hand the Rust-Oleum in gloss finish.  I can't forget to mention the spray handle (I don't know what the formal name is for it).  This was a great purchase.  It attaches to the spray nozzle and helps my spray paint jobs have no drips and even coverage.  Plus my finger doesn't hurt and get covered with paint like it used to before I found this!


I then started work on the lamp shade.  I try to keep cost down on my projects and one of the latest things I have been doing is purchasing $5 twin flat sheets from Walmart to use instead of paying the high price for fabric in the fabric stores.  I can't always get the color I need as in this case so I had to break down and purchase it at my local fabric store.  Of course I used a 50% off coupon.

I then went to my well used cutting mat (excuse the scraps of burlap on it, you'll see why when I show all of the things I have been working on for a wedding.  NOT MINE!)  and my rotary cutter.  I cut lengthwise 4" strips of fabric. 


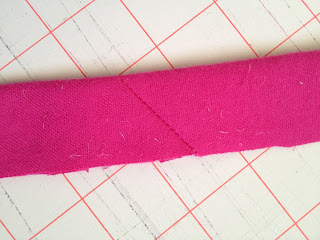
Just a little tip, when joining fabric to not make it so bulky.  Cut the fabric at an angle.


Then lay the fabric with ends overlapping.  Overlap the fabric the width you will be using for a seam allowance.


I used white thread so you could see the seam.


Next, open up the seam with your iron.


Clip the overlapping ends off.


Then, fold the fabric in half and iron.


I gathered the fabric.


Okay, my next step was to attach the first row of fabric to the bottom edge of the shade.  I used my trusty old glue gun. 


I must confess, these are not the actual pictures I took of making the lampshade.  I forgot to take pictures of the process.  So in these images the lampshade is much smaller than the one I used but the process is still the same.  

As I came back around the lampshade I overlapped the fabric and hot glued it in place.  Then to start the next row of fabric making sure to overlap the fabric to hide the sewn edge.   I used my handy dandy measuring tool and made little marks with a pencil.  I used those marks as a guide to get a straight row all around the shade.  Notice I tried my hardest to avoid showing my horrible non-manicured nails!


On the last row along the top of the shade I hot glued bias tape along the top to hide the unfinished edge of the gathered fabric.  Then I took some black fabric and gathered it just like I did the pink fabric and made two flowers from them and glued them on top of the pink ruffle.  Then I added a little bling to the center of the flowers.  Can you tell that when I took these pictures I wasn't planning on posting them in a blog????


I wanted to also post how I made the lampshade for the Rose Lamp but apparently I need to retake some after pictures  because they were even worse than these pictures!

It's a learning process!

Check back in to see more,
Mel


Monday, April 22, 2013

Mirror Mirror On The Wall


As I promised I am showing one of the items in the Princess Room.  The mirror is one of my favorite pieces in the room.  I don't know if it's because it was such a great transformation because I so hated the colors it started out as or if it's because it's a mirror.  I love using mirrors in my decorating.  This was another of my Goodwill finds.  I was lucky enough to find it on one of their 50% of days.  I only paid $5 for it!!!  


This was a super easy project.  Once I had the mirror all I needed was a can of paint.


Valspar was the only spray paint that came in the color I needed.  So that made the paint choice easy!  It actually worked out really well because It is a combination of paint and primer.  Yay!  Only one step!  I HATE to prime!  I set my old piece of cardboard out in the yard and started spraying.  The coverage with this paint was very good.  It took several coats just to make sure I got the paint in all of the intricate carvings of the frame.  I left it out to dry and that was that!  It's amazing what a quick transformation you can get with just a can of paint!


Stay tuned for more!

Thanks for stopping by,
Mel


Saturday, April 20, 2013

Princess Room


This is the princess room I did for my favorite little person.  Her mom is a single mom and has finally been able to get a 2 bedroom apartment.  That meant the little princess would have her own room for the first time ever!  I took this as an opportunity to go all out.  She picked the colors and I went with it.

My Inspiration for the room


I've told you already about my horrible memory.  Well,  this time I have most everything in the room photographed before and after (Shocking, I know!)  Starting on Monday I will be posting each of the different elements in the room and how they were made.  I'll also include where I found them (If I remember).

Many of the items were inspired by Pinterest.  That is another of my obsessions.  I love being able to have those ideas easily accessible to my phone.  Before Pinterest I used to have an album that I clipped pictures from magazines that I liked.  The drawback to that was I couldn't take that huge book around with me to the stores.  Now what I do is open the board on Pinterest before I go into the thrift stores so I can refer back to the pictures for exactly what type of furniture piece will work for the makeover.  It also helps to get a full picture of what I want the room to look like, by having each piece of furniture all in one place.

Don't forget to check back in on Monday to see the first post of this room in the making!

Enjoy,
Mel

Friday, April 19, 2013

My Sweet Little Space


I have been diligently working over the past month to prepare items to sell in a small rented space in a local resale store (When I say small I mean small, only 6 1/2 ft by 2 1/2 ft).  Forgive me if some of my future postings lack before pictures.  I am still struggling with remembering to take pictures of the items I purchase to resell.  Honestly I think I get a little too excited in the whole redo process and completely forget to take a before picture.


I have always been a huge Goodwill shopper and redone projects for my own home or family members.  My secret dream is to own my own little resale store someday.  So I see this as my first step to that dream.  I love all things to do with decorating!!!!  Like many of you, I haven't always had the funds to purchase the latest and greatest furniture items.  That is when I found many years ago my local Goodwill store.  Too my regret, now everyone else knows about my little secret!  I have gotten around this problem by shopping several stores on a consistent basis.  I am lucky enough to live whithin a short distance from a total of 5 Goodwill stores.  I make my little trek to each store looking for treasures.  Sometimes with no luck and other times with a cart full.  Maybe someday I will show a sneak peek of my Arizona Room (Sunroom) filled with future projects.  My family is probably a little worried I might have some slight hoarding problems.  Happily I have been able to contain it all in one room.

Sorry, I drifted there a little.  Back to the latest projects.  Some of the first items I will be selling are a bench (Which I forgot to take before pics of) some crystal lamps, a mirror and some small items.  Oh, and pillows.  Lots and lots of pillows!!  Because I am not yet satisfied with the results of the bench I am going to start with a few pillows I made.  The first one I made with a fabric remnant I bought at my local fabric remnant store SAS for $1.50.  The fringe I used was from my stock of past projects.  It just so happened that I also purchased it from SAS years ago.  All of the pillow forms you see me using are purchased from any local store I can get a good deal at.  I try not to spend anymore than $2 a pillow.  Like I said I'm a bargain shopper.

To start out with I measure my pillow form and add and extra inch the that measurement when cutting my fabric.  I am not a fan of huge seam allowances.  Especially when most of the time I am using remnants and don't have a lot of fabric to spare.  I then, place my fabric right side to right side and use my measuring mat and cutting wheel.  I know now picture!  I promise to include it next time.


You wil notice I am not a fan of pinning.  I usually only use a few pins while sewing.


Pin your fringe to the right side of your fabric.  Make sure to change your needle setting to the right so that when you sew the two pieces of fabric together you can hide the stitch you made to attach the fringe.


Although it is difficult to see in this picture, make sure to try and arrange the fringe in the corner so that you don't accidentally sew one of the ends of the fringe into your seam.


To finish of attaching the fringe, overlap the fringe and finish off your seam.


If you are a pinner.  Pin your two pieces of fabric, right sides together and sew.  Notice I moved my needle to the left.  This is what I was talking about earlier, when I said you would be able to hide the seam you did to attach the fringe.


Remember to leave a large enough opening to insert your pillow filling.


Here you see the pillow turned right side out.  At the bottom is the opening I left to insert the pillow filling


I myself prefer to use a little larger opening to insert my pillow.  That is totally up to you.  Just like the fact that I prefer pre-made pillow forms.


Once your pillow form is inserted use a few pins to keep the two sides together so that you can sew it.  Make sure that the seam you did to attach the fringe is hidden under your fabric so that it will be covered with your top seam.


Some may disagree with my choice of using the sewing machine to do a top stitch to close the pillow.  Others prefer to do this by hand.  I find that the pillow is much more durable when you use the sewing machine.  I know this may seam a little fancy for a pillow fight, but you never know!


This is what the top stitch looks like when finished.


TaDa!!!

Well, there is my first project.  Join me as I have many more to do.  Don't worry, for any of you who are not a fan of sewing.  Many of my projects will not include sewing.  I am a huge fan of the glue gun!  

Enjoy,

Mel


Thursday, April 11, 2013

Welcome!

Thanks for stopping by, this is my first official post. I'm looking forward to sharing my home makeover, lots of DIY tips and all things abode!